Wednesday, December 29, 2010

current obsession: job hunting

I've been out of the loop with regards to the wedding preparations for a few weeks now. Been keeping myself busy with job hunting! Yes, job hunting! Ever since we've received our EAD (Employment Authorization Document) a couple of weeks ago, I've been itching to make use of it. You see, I came here in US under H4 (dependent) visa, which basically allows me to live and study as long as Topher's H1B (working) visa is valid. But, it doesn't allow me to work. So I'm basically a bum for the last two years. It was actually the longest time that I've been idle. Coming of from college, I was lucky to get hired immediately.

So anyway, Topher transferred to a different employer and one of the conditions that he asked, was that he'd be filed for Permanent Resident (aka Green Card) once hired. His new employer has been true to their word; after filing the H1B transfer to them, we received communication from their lawyers about documents needed for filing the GC. We're very lucky that his profession is in demand and in need right now, otherwise, we won't be able to ask for this conditions at all.

To sum it up, our applications for GC are already filed with USCIS and with it, our EAD and AP (Advance Parole) were also filed. Receiving the EAD allows me now to work for any employer and gives me the right to get a SSN. Tao na ako sa America! And this fueled my current obsession on finding a job. I must admit, it has been tough to look for a job nowadays, recession and all. However, the economy if slowly picking up and I have my hopes up that I will be employed as soon as the new year starts.


I've been to a couple of interviews and I'm positive that one of these companies will be the one for me. I'm soo excited to earn again and of course to help out with the household expenses. Not to mention, help out in paying off the expenses for the wedding.

And then it made realized something, I still have a couple of DIY projects in line for the wedding. I should really get it started because once hired, I won't have the luxury of time like before to complete them. Its these things that I want finished, not to create any stress as the wedding date approaches.

Thursday, December 23, 2010

Merry Christmas!

At Christmas, all roads lead home.  ~Marjorie Holmes
(Christmas 2008 at Union Station in Chicago)

To all my readers, far and near! I wish all of you a blessed Christmas. Maligayang Pasko sa ating lahat!

Friday, December 10, 2010

meeting Richelle Mead

Richelle Mead's book signing for the Last Sacrifice tour starts at 7pm. We're running late. We left the house 15 minutes before 6pm but due to the horrendous traffic in I-90, we barely got there in time. The venue is at the school auditorium of Northside Preparatory High School in downtown Chicago.

She started with reading a chapter on the book. She chose one that's not too revealing, conscious of readers who haven't started on the book yet. After reading an excerpt of the book, she proceeded to Q&A. Unfortunately, she cannot disclose much information about the spin-off. Although she mentioned that she did an interview with a national magazine which will be released this weekend with more information about the spin-off, I just forgot if it is Entertainment Weekly or something else. Someone in the audience also asked about the VA movie. She said that the rights have already been bought, but there is no casting happening yet, no movement with regards to the movie production. She asked the audience to spread the word that the information online (IMDB says a movie is in the works and will be released in 2012) are untrue.

(many fans came in for the book-signing)
(answering the Qs from the audience)

She mentioned a few guidelines on the book signing and taking pictures, make it easier on everyone who are in queue for the book signing. And then she started signing books! ;)

(sneaking a picture before my turn)
I asked Topher to stay in the queue with me, so that I can have 6 books signed (3 books per person, 1 personalized and 2 autographed). Also to have him take my pictures while she's signing my books.

(Richelle Mead and me!)
Upon meeting her, she immediately said that she likes my scarf! ;) Cool huh? And then while she was signing my books, I asked if she has plans of visiting Manila. I told her that she has a huge fan base back at home. She explained that she's not the one who's in-charge of picking the places where she'll go. Usually places that are picked are those that are locally publishing the book. In the case of Manila, she said that we import the books from the US and there was no local publisher who usually takes care of the finances. I joked and told her that maybe we should sign a petition to bring her in Manila. She laughed. She mentioned that she have good friends in Seattle who are Filipino and they have been inviting her to visit the Philippines with them. I seconded that and promoted the Philippines even more. So hopefully she'll visit soon. :)

(making small talk while she's signing)

She noticed my books as well, commented that she knows which ones are mine since I had them covered. Also said that the uncovered ones are most probably for friends. :) She's really soooo nice and so cool. I'm extremely grateful for having the chance to meet her.

Excuse me for now, I'll start reading VA: Last Sacrifice. :)

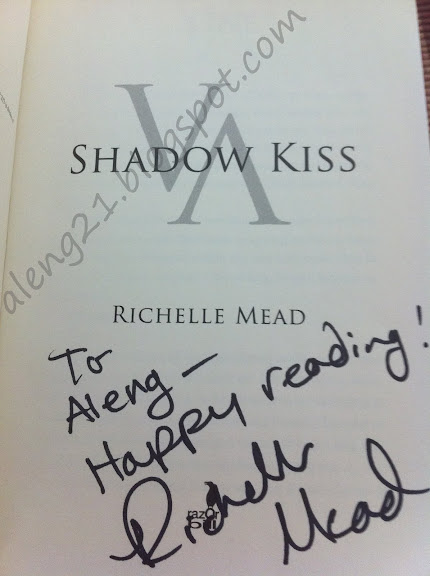
(personalized message on my favorite VA book so far)
(personalized message on Last Sacrifice :D)
 

Thursday, December 09, 2010

VA: Last Sacrifice

I'm excited! *grin*

In about 4 hours from now, I'll get to see, meet and greet Richelle Mead. So who is she? Well, she's the rock star author of the Vampire Academy. The last book on this series was just released on December 7, 2010 and I get to meet her because she's on tour. Honestly, I haven't started on the book yet. I'm delaying the gratification because just like any last book in a great series, I want it to last. Although I'm dying to know what happened to Rose and who did she choose. Wee, I'm really excited!

(3 books of Last Sacrifice. For me, Tin and Suyen; special request to have it signed)

Will post about what happened on the book signing later!


diy invitation: cost analysis

A couple of people have asked me how much I've spent on our Star-ry invitations. I know that it is definitely less that having them done here professionally. However, comparing it to the cost of invitations done in Manila, it may be more. What I loved with this project is that I can use all the materials (read: trimmer, bone folder, ribbons, adhesive) for other paper projects related to the wedding. I have tons of scraps of the Stardream Ruby and Silver and I just know where to use it.

Here is the cost breakdown:
  • Stardream Invitation Envelope A7 (envelopemall.com) - $24.35 (shipping included)
  • Stardream Ruby for the Pocket fold (anchorpaper.com) - $51.20
  • Stardream Silver for the mats (anchorpaper.com) - $13.80
  • Recycled Classic Linen for the Invites and Inserts (anchorpaper.com) - $29.75
  • Shipping Cost from Anchor Paper - $12.13
  • Silver Ribbon for belly band (Divisoria) - $5.00 
  • Fiskars Trimmer (Michaels) - $23.99
  • Terrifically Tacky Tape 1/4 inch (Michaels) - $2.99
  • Bone Folder (Michaels) - $0.99
  • Fiskars Scoring Blade (widgetsupply.com) - $5.28 (shipping included)
  • Terrifically Tacky Tape 1/8 inch, 10 rolls (joanns.com)-  $15.83

Grand total is: $185.31 for 110 invitations. About $1.69 per invite, more or less Php74 with today's conversion. I'm seeing a projection of only about 80 invites needed so I have many extras at hand. Good souvenir huh? :) I have not include the postage to guests here in US, but that's only minimal. I plan to send the invites to NJ to a good friend who will be going home to Manila for the holidays and that saves us a LOT on postage.

One thing that you have to consider before tackling a DIY wedding invitation project is TIME. I have plenty of time on my hands which is why I choose to do this project. I dedicated sooo many hours on completing the project. But I loved the finished product and the pride that I have whenever I saw them knowing that I've made and completed it is priceless. They're fabulous!

I hope this helps!


Wednesday, December 01, 2010

presenting: our Star-ry invitations

My pride. My joy. My babies. Our invitations. :D

I've beaming with joy with the our invitations. This is the biggest DIY project that I've done and I'm actually not sure at first that I can successfully manage to complete it. And yet here they are! Isn't obvious that I'm really happy with them? I'm proud to say that I've conceptualized everything in this project. Sure I did ask that Topher thinks, but knowing myself, I'm my own worst critic. So me being this happy is something else. I can't help but gush every time I've finished assembling one.

I decided on the color scheme, where to buy the paper, creating the pocket folds, designing the main invites as well as the 3 inserts. I created the map on the 2nd insert as well! Ha! Had to cut and measure everything precisely. I had to make sure that the "titles" (Entourage Cards, Location Map and Reception) on the 3 inserts will be precisely in line with each other when placed on the pocket. Designed the monograms and had it cut and adhered to their mats.

So without further ado, here are the invitations:

But wait, if you personally know me and you think you'll be invited to our wedding, close this window! NOW! I still want you to gush over our invites when you personally received them, okay? For everyone else, enjoy!

(Silver A7 envelopes at the background)
(Main Invitation)
(Entourage Card)
(Location Map)
(Reception Card)
I smudged our last name for security purposes (scared of identity theft!) I designed the invitations' main card and 3 inserts using Adobe Photoshop. Fonts used are: Saffron Too for the script and Trajan Pro for the serif.

I initially didn't plan on placing a note on the Reception Card telling that a small/enveloped gift is preferred, but then Topher had to remind me that not everyone have access to the internet especially the oldies (planned to put the preferred gift at wedsite). So I included a note that states that we preferred small gifts that we can bring back here in Chicago after the wedding. I didn't explicitly put "monetary" or "enveloped" words because we still want to receive small tokens from guests!

invitation assembly

Finally, all components of the invitations are ready for assembly. After making the belly bands last week, everything is set. For the assembly, I first started with adhering the main invitations to the silver mats and then finally adhering them to the pocket folds. I decided that it's easier for me to adhere first all the invitations before placing the inserts and their respective belly bands.

(the pretty pocket folds)
(1st assembly: main invites, silver mats and plum pocket folds)
(placing double sided tape on the main invitation)
(placing double sided tape on the silver mat)
(main invite and silver mat together)
(main invite and silver mat adhered on the plum pocket fold: BEAUTY!)
After adhering the main invites with the silver mats to the pocketfolds, I had them placed under stacks of books to make sure that all folds and adhesive stick. Good thing Topher has lots of thick and heavy (PT) books that I can use. :) Last night, I've assembled about 20 invitations and then got stressed out with the guest list when called it a day.
(pocket folds, 3 inserts, and belly bands completed)

diy pocketfolds

Here are the instructions on how I created our pocket folds. Creating the pocket folds myself is definitely cheaper than getting the ready-made-ones from Cards and Pockets. I made about 110 pocket folds and that's more than what we actually need. Of course we want extras for last minute guests, invitations lost in the mail and a couple to frame and keep.

SUPPLIES:
- Custom card stock. For more information on my paper order, click here.


- Paper cutter with scoring blade (Fiskars bought at Michaels)
- Scissors (sharp and decent ones)
- Bone Folder (also known as boning/transfer tool)
- Double sided permanent tape (Terrifically Tacky Tape 1/8" bought online from JoAnn's)
- Pencil

(forgot to include the green bone folder)
- Flap templates (optional) - You only need to make this if you want to make the points of the pocket folds. Obviously, this will add more work on making the pocket folds and you can have this skipped. I had mine created from scraps of paper.


INSTRUCTIONS:
1.) First, trace the flap templates on each side. Here I am tracing the template for the flap.


2.) And then, here I am tracing the template for the pocket.


3.) Cut carefully along your pencil lines.


4.) Score 3" from the pointed flap.


5.) Score again from the outside fold. (This section is were the invitation will be placed) Measurement for this is 5".


6.) Make the final score 3" from the end of the card stock.


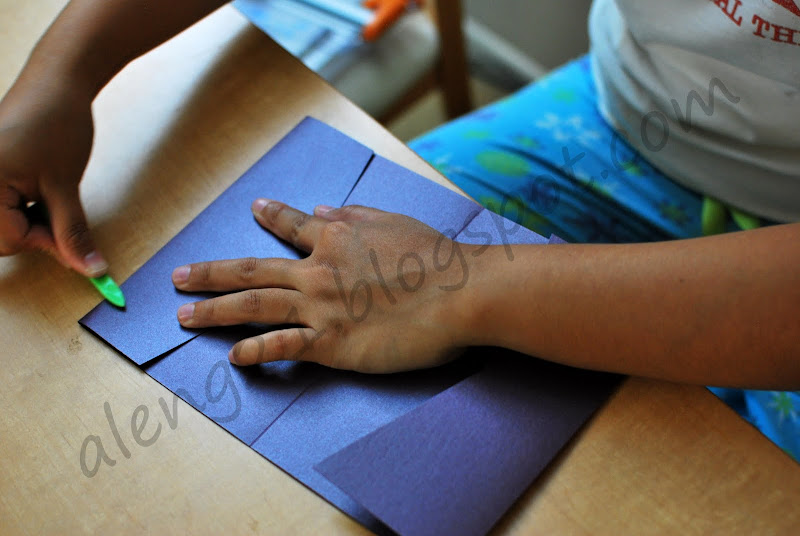
7.) Use the bone folder to fold along your scored line to make the pocket.


8.) Once you have folded the pocket and made a good crease, unfold it again. Add the adhesive tape on both sides. (see the red adhesive)


9.) Fold over the pocket flap to make the pocket. Make the middle fold next.


10.) Make the top fold for the pointed flap. Make use of the bone folder to make clean, neat folds.


11.) Fold the whole thing over and then tada! It's done! :)


It's actually pretty easy to make the pocket folds, but it can be very tedious and time consuming. I dedicated a few days concentrated on just making the pocket folds. I do them by batch, so that I won't get bored. I actually followed the instruction from Heather Drive's blog She started with scoring the card stock first while I did the tracing first. It would depend on what you're comfortable doing that get's you done fastest.

LinkWithin

Related Posts with Thumbnails