Showing posts with label DIY. Show all posts

Monday, January 03, 2011

diy rosary wedding cord

Happy New Year everyone! :)

I'm happy that my first post for this year is a productive one. It's less than 6 months before the big day, I want to make sure that we make use of the time wisely. The last thing that we want to happen is to see the wedding day coming and we're cramming in completing our DIY projects.

The project that I decided to tackle after our invitations is the rosary wedding cord. I'm quite handy with paper crafts but it's my first time in doing beading/jewelry making. I initially thought that I would be having a hard time in doing the wedding cord but is pleasantly surprised that it is actually easy! When I went back home, I had the chance to get all the materials that I needed for the project when we visited Divisoria and Quiapo. I basically patterned our wedding cord from Lights and Binds website, I love their rosary style wedding cords.

I thought I'd share the materials and instructions on creating our DIY rosary wedding cord, so that you can make your own too! Okay, let's start with the materials:


1. Beads that catches your fancy. I think the ones that I used are called class-A swarovski. You can use any beads that you want here.
2. Different kinds of spacers. I'd suggest that you buy two packs of every design. You don't want to run out on the spacers while finishing the cord. Also the circle ones are a must.
3. Pliers and tape measure. You want the to have at least 50 inches for each loop.
4. Rings and end-clamp. Ok, I honestly don't know how you call the "end-clamp", but it's basically a clamp with a small hole in between which you place in the beginning and end of each line. It will hide the knot that you'll create with the nylon cord.
5. Trinkets of your choice. Since this is a rosary wedding cord, I chose a crucifix, a brooch for the middle and letters of our initials.
6. Nylon cord and bead board (optional). Choose a thicker nylon cord.

Now, for the instructions:


1. I initially laid out the sequence of the beads and spacers that I wanted using the bead board, but that's totally optional. First, you want to measure the nylon cord, make sure that you make an allowance on the length before you cut the cord. Make a knot using the pliers and pull until the knot is small enough.

2. Place the end-clamp in a way that if you close the clamp, it will swallow the knot. Then place the sequence of spacers that you want. How many spacers to put before and after the beads and the mysteries, it will be totally up to you. Just make sure that once all have been placed, the length of the loop will make at least 50 inches. Place another end clamp before making a knot to secure the end. Close the clamps before cutting the cord near the knot.

2a. After finishing the 2 loops, and the end tail of the rosary, connect all three using the brooch in the middle.

2b. For our initials, I basically created a small link using the rings and put clasps at the end. By putting the clasps, it's now optional if we wanted to include the initials or take it off.

3. I used white beads for the 10 Hail Marys and purple and gray beads for the mysteries.

4. The ones shown in pic 4 is the tail of the rosary. I basically followed the sequence form the Lights and Binds website.

If my instructions are confusing, let me know through the comments sections and I'll try my best to explain. :) Now I present our DIY rosary wedding cord!

(I used a brooch in the middle)
(crucifix)
(white beads for the 10 Hail Marys and purple and gray beads for the mysteries)
(a clasp at the end to make the initials optional)
(here connected to the brooch)
(our rosary wedding cord with the initials)

Not bad for a first time, right?! :) I'm really happy on how that wedding cord turned out. A bit surprised that it was actually quite heavy! For the cost, not including the strands of beads that I didn't get to use (about 4 strands, I bought extra), it will be about Php600-700. All materials are bought from D.I.Y Store and Wellmanson in Quiapo, Manila.

I can now happily take this one off the wedding list! Wedding Cord = Checked!


Thursday, December 09, 2010

diy invitation: cost analysis

A couple of people have asked me how much I've spent on our Star-ry invitations. I know that it is definitely less that having them done here professionally. However, comparing it to the cost of invitations done in Manila, it may be more. What I loved with this project is that I can use all the materials (read: trimmer, bone folder, ribbons, adhesive) for other paper projects related to the wedding. I have tons of scraps of the Stardream Ruby and Silver and I just know where to use it.

Here is the cost breakdown:
  • Stardream Invitation Envelope A7 (envelopemall.com) - $24.35 (shipping included)
  • Stardream Ruby for the Pocket fold (anchorpaper.com) - $51.20
  • Stardream Silver for the mats (anchorpaper.com) - $13.80
  • Recycled Classic Linen for the Invites and Inserts (anchorpaper.com) - $29.75
  • Shipping Cost from Anchor Paper - $12.13
  • Silver Ribbon for belly band (Divisoria) - $5.00 
  • Fiskars Trimmer (Michaels) - $23.99
  • Terrifically Tacky Tape 1/4 inch (Michaels) - $2.99
  • Bone Folder (Michaels) - $0.99
  • Fiskars Scoring Blade (widgetsupply.com) - $5.28 (shipping included)
  • Terrifically Tacky Tape 1/8 inch, 10 rolls (joanns.com)-  $15.83

Grand total is: $185.31 for 110 invitations. About $1.69 per invite, more or less Php74 with today's conversion. I'm seeing a projection of only about 80 invites needed so I have many extras at hand. Good souvenir huh? :) I have not include the postage to guests here in US, but that's only minimal. I plan to send the invites to NJ to a good friend who will be going home to Manila for the holidays and that saves us a LOT on postage.

One thing that you have to consider before tackling a DIY wedding invitation project is TIME. I have plenty of time on my hands which is why I choose to do this project. I dedicated sooo many hours on completing the project. But I loved the finished product and the pride that I have whenever I saw them knowing that I've made and completed it is priceless. They're fabulous!

I hope this helps!


Wednesday, December 01, 2010

presenting: our Star-ry invitations

My pride. My joy. My babies. Our invitations. :D

I've beaming with joy with the our invitations. This is the biggest DIY project that I've done and I'm actually not sure at first that I can successfully manage to complete it. And yet here they are! Isn't obvious that I'm really happy with them? I'm proud to say that I've conceptualized everything in this project. Sure I did ask that Topher thinks, but knowing myself, I'm my own worst critic. So me being this happy is something else. I can't help but gush every time I've finished assembling one.

I decided on the color scheme, where to buy the paper, creating the pocket folds, designing the main invites as well as the 3 inserts. I created the map on the 2nd insert as well! Ha! Had to cut and measure everything precisely. I had to make sure that the "titles" (Entourage Cards, Location Map and Reception) on the 3 inserts will be precisely in line with each other when placed on the pocket. Designed the monograms and had it cut and adhered to their mats.

So without further ado, here are the invitations:

But wait, if you personally know me and you think you'll be invited to our wedding, close this window! NOW! I still want you to gush over our invites when you personally received them, okay? For everyone else, enjoy!

(Silver A7 envelopes at the background)
(Main Invitation)
(Entourage Card)
(Location Map)
(Reception Card)
I smudged our last name for security purposes (scared of identity theft!) I designed the invitations' main card and 3 inserts using Adobe Photoshop. Fonts used are: Saffron Too for the script and Trajan Pro for the serif.

I initially didn't plan on placing a note on the Reception Card telling that a small/enveloped gift is preferred, but then Topher had to remind me that not everyone have access to the internet especially the oldies (planned to put the preferred gift at wedsite). So I included a note that states that we preferred small gifts that we can bring back here in Chicago after the wedding. I didn't explicitly put "monetary" or "enveloped" words because we still want to receive small tokens from guests!

invitation assembly

Finally, all components of the invitations are ready for assembly. After making the belly bands last week, everything is set. For the assembly, I first started with adhering the main invitations to the silver mats and then finally adhering them to the pocket folds. I decided that it's easier for me to adhere first all the invitations before placing the inserts and their respective belly bands.

(the pretty pocket folds)
(1st assembly: main invites, silver mats and plum pocket folds)
(placing double sided tape on the main invitation)
(placing double sided tape on the silver mat)
(main invite and silver mat together)
(main invite and silver mat adhered on the plum pocket fold: BEAUTY!)
After adhering the main invites with the silver mats to the pocketfolds, I had them placed under stacks of books to make sure that all folds and adhesive stick. Good thing Topher has lots of thick and heavy (PT) books that I can use. :) Last night, I've assembled about 20 invitations and then got stressed out with the guest list when called it a day.
(pocket folds, 3 inserts, and belly bands completed)

diy pocketfolds

Here are the instructions on how I created our pocket folds. Creating the pocket folds myself is definitely cheaper than getting the ready-made-ones from Cards and Pockets. I made about 110 pocket folds and that's more than what we actually need. Of course we want extras for last minute guests, invitations lost in the mail and a couple to frame and keep.

SUPPLIES:
- Custom card stock. For more information on my paper order, click here.


- Paper cutter with scoring blade (Fiskars bought at Michaels)
- Scissors (sharp and decent ones)
- Bone Folder (also known as boning/transfer tool)
- Double sided permanent tape (Terrifically Tacky Tape 1/8" bought online from JoAnn's)
- Pencil

(forgot to include the green bone folder)
- Flap templates (optional) - You only need to make this if you want to make the points of the pocket folds. Obviously, this will add more work on making the pocket folds and you can have this skipped. I had mine created from scraps of paper.


INSTRUCTIONS:
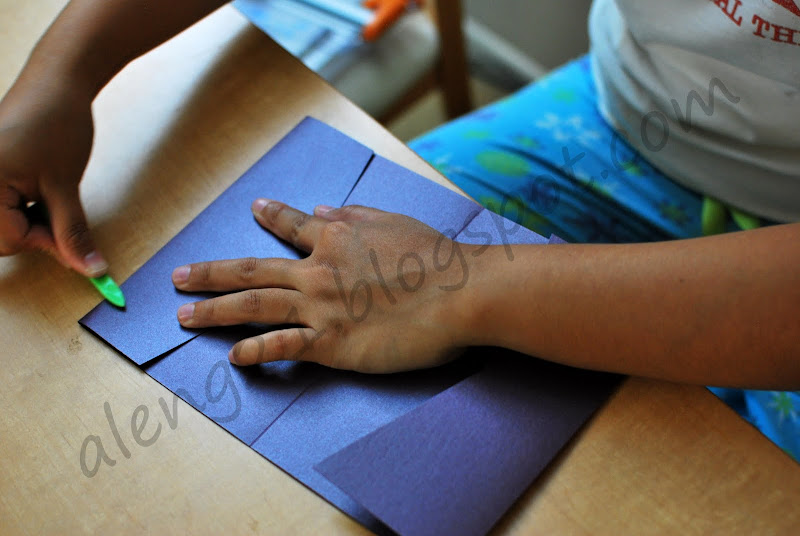
1.) First, trace the flap templates on each side. Here I am tracing the template for the flap.


2.) And then, here I am tracing the template for the pocket.


3.) Cut carefully along your pencil lines.


4.) Score 3" from the pointed flap.


5.) Score again from the outside fold. (This section is were the invitation will be placed) Measurement for this is 5".


6.) Make the final score 3" from the end of the card stock.


7.) Use the bone folder to fold along your scored line to make the pocket.


8.) Once you have folded the pocket and made a good crease, unfold it again. Add the adhesive tape on both sides. (see the red adhesive)


9.) Fold over the pocket flap to make the pocket. Make the middle fold next.


10.) Make the top fold for the pointed flap. Make use of the bone folder to make clean, neat folds.


11.) Fold the whole thing over and then tada! It's done! :)


It's actually pretty easy to make the pocket folds, but it can be very tedious and time consuming. I dedicated a few days concentrated on just making the pocket folds. I do them by batch, so that I won't get bored. I actually followed the instruction from Heather Drive's blog She started with scoring the card stock first while I did the tracing first. It would depend on what you're comfortable doing that get's you done fastest.

Monday, November 29, 2010

update: diy Invitations

I basically rallied my way with the invitations! :) I'm almost done with them. Here were my to-do-list since my last post about the invitations:

Print the main invitations and cut to proper size - DONE!
Print the 3 inserts and cut to their proper sizes - DONE!
Decide and make mock of ribbon band - DONE!
Make mock of monogram seal - DONE!
Adhere the silver invitation mats to the main invites - DONE!

And, I've already made the following:
Printed and cut all monogram seal - DONE!
Adhere the seal to purple and silver mats - DONE!
Adhere the completed seal with the silver ribbon - DONE!

I'm pretty happy with the outputs if I say so myself. Will need to do the following in the next few days:
- Assemble the invitations
- Finalized the guest list for the wedding
- Print the guests' name in the envelopes

Yay! We're right on schedule with the invites. :) Funny thing about the monograms, I've created intricate, artsy fancy ones but Topher chose one of the simplest monograms I've done. I must admit it goes really well with the invitations.

(printed the 1st insert)
(monogram seals)
(monogram seals with the purple and silver mat)
(completed monogram seals)
(belly bands with the complete monogram seals)

LinkWithin

Related Posts with Thumbnails